Plottr is my latest bid to find a story outlining tool that will tame my excesses as a discovery writer and help me to work faster. I’ve looked at how I hoped to use it with three different projects, now it’s time for a deep dive into the experience.
Navigating the Plottr interface
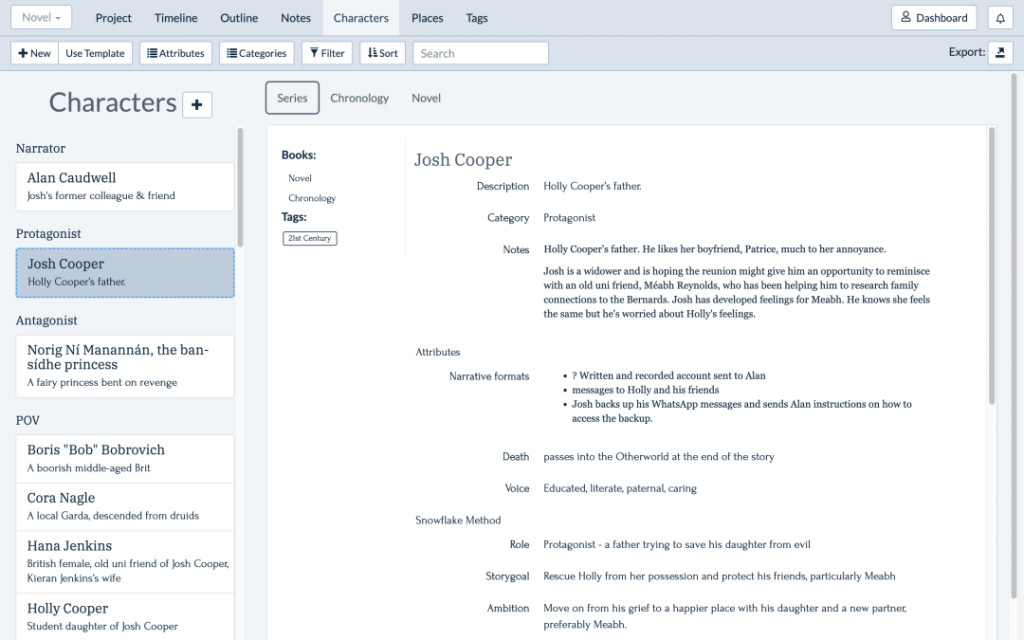
When you open a timeline, the main menu bar has tabs for Project, Notes, Characters, Places and Tags. Notes, Characters and Places are self-explanatory, and all include a name or title, short description which will appear in drop-down menus, a category, an image, and notes. There’s a side-bar displaying books and tags for each entry, while Characters also lets you add attributes and templates.
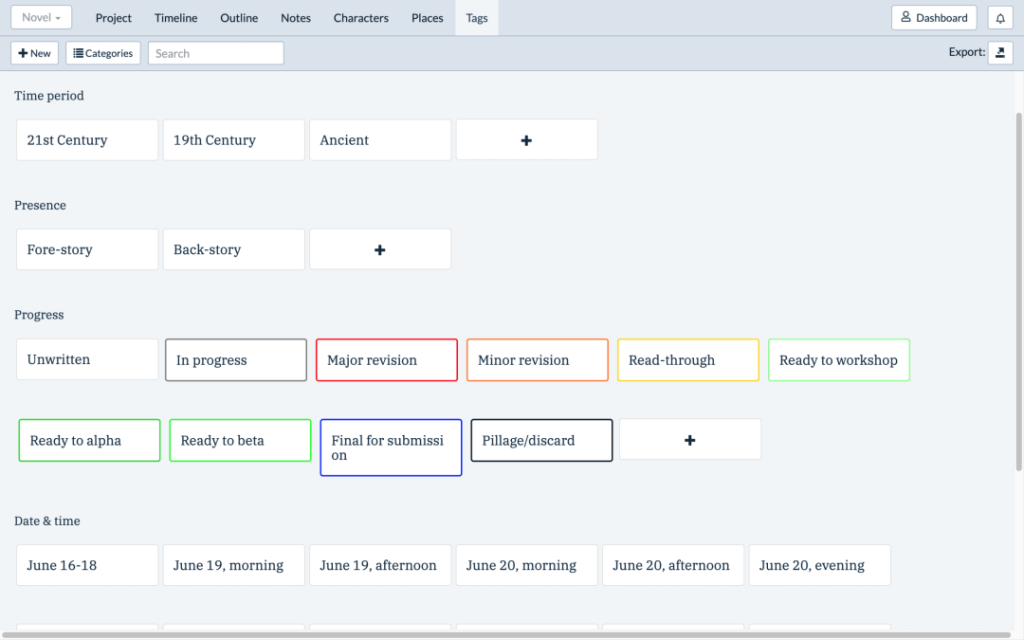
Tags are items of meta-data which can apply to any object in your story. For example, my new project has three time periods: Ancient, 19th century and 21st century. I used tags to indicate which scenes, characters and places are relevant to each time period. As the story developed, I created more tags to indicate themes or parts of my story structure.
Projects takes your Notes, Characters, Places and Tags further, for writers who are working on book series. The project view displays all of the books in a series, and when you add a new book, the characters, places and tags will already be populated with information that you can pick up and adapt to the new story.
My three timelines will interweave in the final story, but I had to understand them before I could start writing. In Plottr’s Project view, I created a book titled “Chronology”, which has a plot line for each period. Once I had established these timelines, I created a new book in the series, called “Novel”, which follows the present-day story. Plottr populated this with the characters and places from the chronology, and I copied my timelines into the new book. Then I chopped them up into revelations which unfold in the present day through dreams, flashbacks, and historic records.
Plottr’s template wonderland
Templates are a game-changing feature of Plottr that continue to grow with the platform. I’ve already mentioned the Snowflake method, but there are dozens of other storytelling methods.
Plottr has created more than 30 templates, from the classic Hero’s Journey to modern formulas like Take Off Your Pants and genre recipes such as Romancing The Beat. They include notes explaining how to use them, and you can mix and match as many as you need, combining a classic five-act structure with a dedicated crime novel format, crossed with a romance if that helps you.
You’ll also find templates for individual scenes like Goal, Motivation, Conflict, and character templates such as the infamous Proust questionnaire or a classic Dungeons & Dragons character sheet. Again, you can use several templates for each scene or character, and delete the ones you don’t want to use. If you can’t find the template you want, create your own and share them with other users online.

Plottr tutorials
The Plottr team puts a lot of effort into online assistance. Their YouTube channel hosts an extensive library of bite-sized tutorials for beginners that explain the ins and outs (although the narrator’s accent grated on me).
They also host regular webinars about different aspects of the app. Each release of new features is accompanied by a video and a webinar.
Using Plottr with Scrivener and other software
This is a weakness, but one that I expect to be resolved. You can import and export from Plottr into Word or Scrivener, and vice-versa. As yet, it only supports Scrivener 2, so if you’re on the latest version of Scrivener, you’ll have to convert the exported files as you open them.
Unlike Aeon Timeline, there’s no two-way sync between Plottr and Scrivener. It would also have been nice to get an export into the open standard mind-mapping format, OPML.
Syncing between devices
There are currently Windows, Mac, iOS and Android versions of Plottr, although the tablet version has some differences that I’ve yet to get to grips with. There’s no Linux version, but command-line fundamentalists are liable to look at Plottr’s visual interface with disdain, anyway.
The standard version of Plottr uses local storage and syncs via third party services like Dropbox, OneDrive, iCloud and so on. Plottr Pro proprietary cloud storage which automatically syncs between your different devices.
Split screen Plottr, please
I love the split-screen view in Scrivener that enables you to call up character profiles, location details and other research while you’re writing.
At first, the basic story in my new Nightmare Vacations novel was populated with characters called “the king”, “the father” and “the daughter” in basic locations. Eventually, I had to name these folks and develop their personalities, usually at the same time as their stories became more complex. I found myself switching frequently between the Timeline, Place and Character tabs to keep everything consistent and copy-paste the correct spellings. A split-screen view would have made this a lot easier.
I had also compiled a lot of research in Scrivener before I began to create the story. I kept this open on my right-hand monitor as I worked in Plottr on my left screen. Scrivener’s layout is better for organising a lot of notes, but this wouldn’t work if you were working on a single screen.
The wealth of templates is a powerful resource, but it’s frustrating to go through the selection process for each scene you add. I’d prefer Plottr to either add the templates from your previous scene, or allow you to choose certain templates as a default for each project.
Fortunately, the development team are very responsive and open to user input. The development timeline is available online and it’s updated regularly — new features arrived this week that I’ve yet to investigate.
Plottr is a keeper
Plottr is a useful tool if you’re a discovery writer like me, who wants to rein in their worst pantser impulses and make their writing more efficient.
Natural planners will also find it a useful resource and the detailed templates open a valuable library of storytelling methods, and it makes an excellent companion to Scrivener’s strengths in writing and research. Scrivener’s devs are friendly and responsive, but they could probably learn from Plottr’s approach. I’m personally very glad there’s an Android app as well as Mac, Windows and iOS.
Pricing is reasonable and the standard package contains all of the features I’ve discussed, except for online storage and auto-syncing (but it works with Dropbox, OneDrive, etc). I’ll continue to use Plottr and I look forward to watching it develop.
This post contains affiliate links.
I will earn a small commission if you complete a purchase via these links.
One reply on “Plottr: simple visual story planning, part 2”
I’ve been away for a while [DRUM ROLL] writing a new novel in my Nightmare Vacations series. It’s also been an opportunity to test drive Plottr, a visual tool for story planning.
For a lazy pantser like me, outlining can be a chore that gets in the way of turning that great new idea into a story. I want to scribble down a few notes and set off for the exciting territory of writing my first draft. The truth is that without a map, it’s easy to get lost.
Not all pantsers are lazy. Some are genuine discovery writers who can wing it from idea to first draft. They don’t mind the extra editing and rewrites that come from following your imagination as words land on the page. Some pantsers are naturally good enough to create a coherent first draft on the fly. I salute you!
I’m a better when I have a strong outline, deep research and well-drawn characters to guide me. Things still change when the characters begin to interact in the magical way that makes writing a joy, but they will be more consistent and I won’t lose so much time on research and plotting tangents.
Plottr dashboard shows your current projects and lets you access settings.
My journey in story outlining
I write in Scrivener, using the corkboard to mimic the note cards many writers use to organise their stories. When I’m developing the story, I like to create a timeline of events that shows me how the story fits together. It’s useful if you have several story arcs, or timelines that might appear out of sequence in your narrative.
When I wrote and revised Blood River, I used the mind-mapping tool Xmind to outline the story and draw a character circle that showed the relationships and how they changed. I still use Xmind for general mind-mapping, but I want a bespoke tool for outlining.
I developed In Machina, my sci-fi WIP, using two pieces of outlining software that I hadn’t tried before: Scapple and Aeon Timeline 2. Scapple is the official mind-mapping companion app to Scrivener; Aeon Timeline is a powerful timeline-mapping tool, now on its third generation.
Scapple was too basic for my needs, while Aeon Timeline is the opposite, so rich with features that the learning curve felt like it would never end. I looked at several outlining tools in Planning tools for writing novels.
I’ve tried Plottr with two new projects: a second novel in the Nightmare Vacations universe and a short story to refresh my palate. I’m also rebuilding the synopsis of In Machina as I edit, to create a clean outline for a project that threatens to outstay its creative welcome.
Hopefully, Plottr will be a happy place between general-purpose mind maps and Aeon Timeline’s feature overload.
Book series can be grouped in Plottr’s project view.
Plottr’s visual experience
Plottr presents a simple visual timeline interface. You build multiple plot lines that scroll across the screen, each one colour-coded. Detail the main plot of your story, break it down into story arcs, or use individual plots for each character. I like to have a plot line which just shows the date or time as your story develops.
There are three zoom levels — useful for a typical novel with around 30 chapters — and fast scroll buttons for Beginning, Middle and End. You can also choose between horizontal and vertical scrolling.
Each plot line is broken into chapters, which are sub-divided into scenes and grouped together into Acts and Parts. Chapters can be renamed as Beats or named individually. When you add a scene to a plot line, you give it a title and flesh it out with a synopsis.
Different timelines can be expanded or hidden in Plottr’s timeline view.
The snowflake story method
This is one of Plottr’s strengths: it’s designed around the Snowflake storytelling method. You begin with a one-sentence outline and build up your synopsis until you’re ready to write. With Plottr, you can write a single synopsis for each chapter, add more scenes to break it down, or detail the chapter via distinct plot lines. Or you can do all of these.
You can also view and edit your story in the text-only Outline mode, which lists your chapter titles on the left, with dots showing which plot lines are active in each chapter. Your chapter synopsis and the scenes within it scroll vertically on the right.
Each scene has a title, description, attributes and template options. The description can be as long as you want and fully formatted with pictures, links and bullet points. Attributes can be anything you want, from data points such as date and time, to plot information like character motivations or the dramatic structure of the scene.
A sidebar on the left of each scene window indicates which book it’s from, and the plotline, chapter, characters, places and tags involved. You can assign colours to the background and outline of each scene as it appears in your Timeline view. I like to show where it is in the writing process: unwritten, first draft, awaiting feedback, revised, and so on.
Intermission alert
I’ve taken a different approach with each project: Nightmare Vacations #2 is a Snowflake outline; my short story uses Lester Dent’s classic pulp outline; and In Machina is a linear process where I’m simply adding chapters as I work through the book.
The Nightmare Vacations outline would power me through a 50,000-word sprint in April, so it had to be well-organised. The short story needed less detail: Dent’s punchy outline breaks it up into sections of about 300 words. In Machina is about understanding a 110,000-word story — the first part of a trilogy — as I go through beta reader feedback.
Each project has been creatively productive so far, and they’ve shown me strengths and flaws in Plottr. It looks like a good fit for me.
In Part 2, I dig deeper into the experience of using Plottr alongside Scrivener and across different devices.